

Chapter 2 - Designing the Interface
In This Tutorial
• Learning to Design the Interface
• Adding controls
• Setting Control Properties
2.1 Adding Controls to the Form
The first step in creating a new VB2010 project is to design the interface of the application. You design an interface by adding controls to the form and then set their properties. You can add controls from the Toolbox. To see the Toolbox window, you can use the short-cut keys Ctrl+Alt+X or click on the Toolbox icon on the toolbar on top of the designer environment. The Toolbox consists of many useful controls such as Button, TextBox, Label, ComboBox, CheckBox and more, as shown in Figure 2.1
Figure 2.1
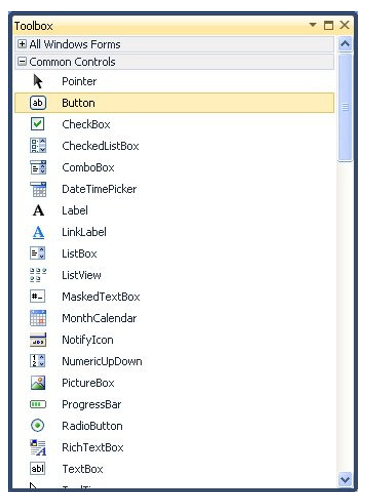
The Visual Basic 2010 Control Toolbox consists of all the controls essential for developing a VISUAL BASIC 2010 application. Controls in VB2010 are useful tools that can perform various tasks. We categorized into Common Controls, Containers, Menus, Toolbars, Data, Components, Printings and Dialogs. Now, we will focus on the common controls. Some of the most used common controls are Button, Label, ComboBox, ListBox, PictureBox, TextBox and more. To add a control to the form, just drag the particular control and drop it into the form. After putting it into the form, you can change its size and position easily. You can add as many controls as you want, but avoid crowding the form.
2.2 Setting the Control Properties Using Properties Window
To customize the interface to the users, you need to set the properties of the controls, from the form itself to the controls you add to the form. You can set the properties of the controls in the properties window at design time or by using the code. We shall learn how to set the control properties using the properties window first.
To set the properties of an object, right click on the object and choose properties in the dialog that appears to view the properties window. In the properties window, you can change the values of the properties that appear in a dropdown list, as shown in Figure 2.2. It is a typical Properties window for a form. The default text of the Text property is Form1, its default name is also Form1. You can change the title of the text to whatever title you like by editing the text.
The properties of the object appear in a list in the left column while the items listed in the right column represent the states or values of the properties. You can set the properties by highlighting the items in the right column then change them by typing or by selecting options. For example, to change the form's title to any name that you like, simple click in the box on the right of the Text property and type in the new name. In the properties window, the item appears at the top part is the currently selected object.
Figure 2.2 : The Properties Window

Example 2.1: Creating a Simple Program that display a welcoming message
In this example, we will create a simple program that will display a welcome message when you load the form. First, change the properties of the form as follows:

Next, insert a label into the form and set its properties as follows:

Next, click on the Form and enter the following code:
Private Sub WelcomeMsgFrm_Load(ByVal sender As System.Object, ByVal e As System.EventArgs) Handles MyBase.Load
     MsgLbl.Text = "Welcome to VB2010 Programming"
End Sub
Now press F5 to run the program, you will see the message displayed on the label, as shown in Figure 2.3

2.3 Setting Control Properties using Code
You can also change the properties of the object using code. The syntax to manipulate the properties of an object is
Object.property=property_Value
For example,
TextBox1.Text= "Welcome to VB2010"
TextBox2.Text= 100
The above code sets the text property of TextBox1 to display the text “Welcome to VB2010” and set the value of TextBox2 to 100.
Other properties you can change to give special effects at runtime are color, shape, animation effect and so on. For example, the following code will change the form color to yellow every time the form is loaded. VB2010 uses RGB (Red, Green, Blue) to determine the colors. The RGB code for yellow is 255, 255, 0. Me in the code refers to the current form and Backcolor is the property of the form's background color. The formula to assign the RGB color to the form is Color.FormArbg(RGB code). Now, click on the form to go into the code window. Next, enter the following code between the opening statement Private Sub and the closing statement End Sub, as shown below. You don’t have to worry about the code and the code structure yet; we will explain that in chapter 3.
Public Class Form1
Private Sub Form1_Load(ByVal sender As System.Object, ByVal e As System.EventArgs) Handles MyBase.Load
        Me.BackColor = Color.FromArgb(255, 255, 0)
End Sub
End Class
Now Press F5 and you will see a form appear with a yellow background, as shown in Figure 2.4
You may also use the following procedure to produce the same effect.
Private Sub Form1_Load(ByVal sender As System.Object, ByVal e As System.EventArgs) Handles MyBase.Load
      Me.BackColor = Color.Yellow
End Sub

Here are some of the common colors and the corresponding RGB codes. You can always experiment with other combinations, but remember the maximum number for each color is 255 and the minimum number is 0. The table below shows some of the common colors with their corresponding codes.

The following is a program that allows the user to enter the RGB code into three different Textboxes and when he or she clicks the Display Color button, the background color of the form changes according to the RGB code.
The code
Private Sub Button1_Click(ByVal sender As System.Object, ByVal e As System.EventArgs) Handles Button1.Click
Dim rgb1, rgb2, rgb3 As Integer
rgb1 = TextBox1.Text
rgb2 = TextBox2.Text
rgb3 = TextBox3.Text
Me.BackColor = Color.FromArgb(rgb1, rgb2, rgb3)
End Sub

Summary
• In section 2.1, you have learned how to add controls to the form from the Toolbox.
• In section 2.2, you learned how to set the properties of the controls using the properties window.
• In section 2.3, you learned how to set the properties of the controls using code. For example, you learned how to set foreground and background colors using RGB code.
Thanks for this tutorial...
ReplyDeletewaiting other chapters :)